![]()
![]()
![]()
Teachers Introduction Course to LEGO® Mindstorms NXT & EV3
(version 4.5)
UNIT 10. To light or not to light: how to use the legacy lamp in EV3.
One of the very nice functionalities of the Mindstorms NXT platform missing in the EV3 set is the ablility to use the lamp or legacy light by using a special NXT/RCX converter cable. In this teaching unit we will see in detail how to use the lamp in Mindstorms EV3, we will point out an awkard limitation in all platforms (NXT, LabVIEW and EV3), and especially we will learn a strategy for synchronizing multiple lamps with each other and with other parts of the program using Master/Slave design pattern architecture.
This teaching unit concludes with an addendum that shows a more efficient way to control the legacy lamp in EV3, so make sure that you read it if you are interested in this subject.

Lamp or legacy light, NXT/RCX converter cable and transparent 2x1 yellow brick
Unit 10 exercise 1: Turn ON and OFF the LEGO lamp or legacy light using a motor block.
In the Mindstorms NXT software we cab turn on or off the lamp using the Lamp block. The Lamp block has four parameters: Port, Action (On or Off) and Intensity, as shown below.
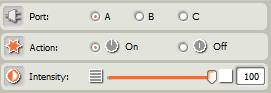
NXT program to repeatedly turn the lamp on for one second, then off for one second and Lamp block attributes window
Because the lamp is an actuator, we could also use a regular Motor block to turn it on, using the Port, the Power for the light intensity and Seconds of Duration for time, like the image below shows.

NXT program to repeatedly turn the lamp on for one second, then off for one second using a Motor block
Interestingly the program works really well in NXT, but does it work in EV3?
EV3 initial test program to turn the lamp on and off that does not work as expected!
If you run this EV3 program, you will see that the program turns on the lamp but not for the specified time, one second. The lamp turns on but it turns off very quickly, so you cannot control how much time it is on.
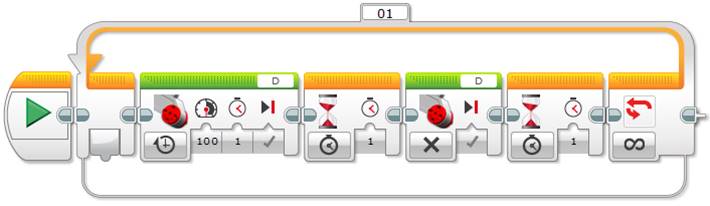
So how can we turn on the light for one second or more in EV3? The answer is we need to use a timed loop to keep the lamp on for the desired time or seconds.
EV3 program to tun the lamp on for one second and off for one second using a Motor block and a timed loop
Unit 10 exercise 2: Control the lamp in a sequence using a motor block.
The next exercise will be to turn the LEGO lamp or legacy light on and off in a sequence. Although this is a simple exercise we will use it to show some limitations when optimizing the code.
To do this simple exercise we can just repeat the previous code but using different parameters for time and power.

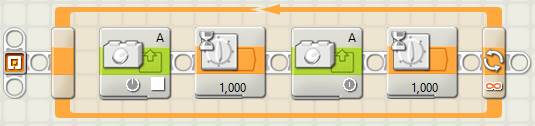
Turns the lamp on for one second, off for a second, then back on for two seconds
What is the problem with this solution? The disadvantage is that every time you want to turn the lamp on you need to repeat the loop. So how can we make the code more efficient? The answer is by creating your own block or subprogram, called My Block (Tools > My Block Builder).
Lamp My Block with Port, Power and Seconds as input parameters
In the following example we use the previous Lamp My Block to sequentially control four lamps connected to the four different actuator or motor ports of the EV3.

Sequentially turn four separate lamps on and off for one second each
What is the advantage of this solution? This solution is much more compact and readable, and at the same time it occupies less space in the EV3 memory.
Unit 10 exercise 3: Synchronize several lamps at a time using My Blocks.
The next step is to synchronize several lamps at the same time. As we can suspect, we need to run each lamp in a different sequence beam or data cable to control the timing, making sure that each sequence lasts the same time.
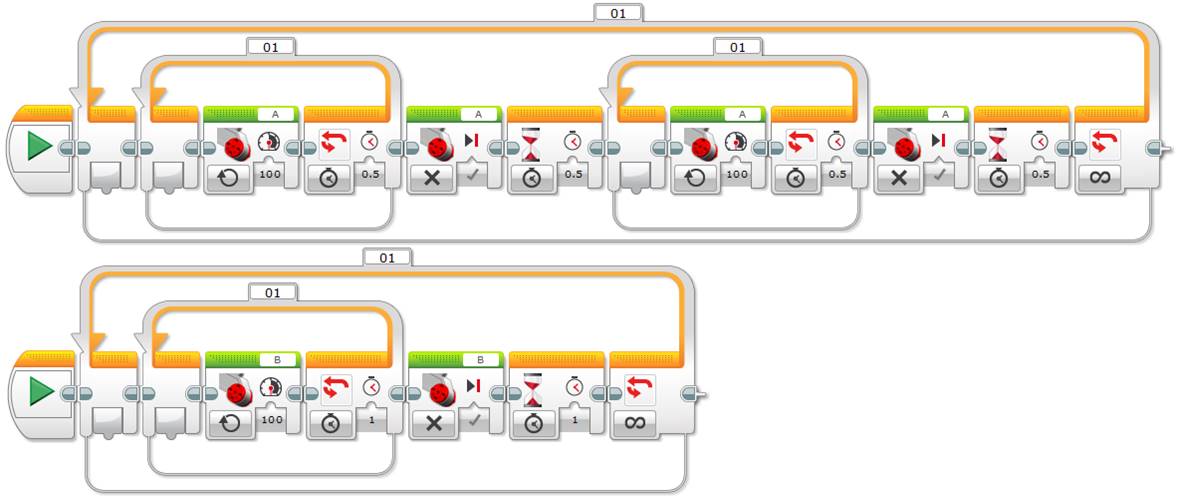
Synchronizes two lamps every second and every half a second using two sequences
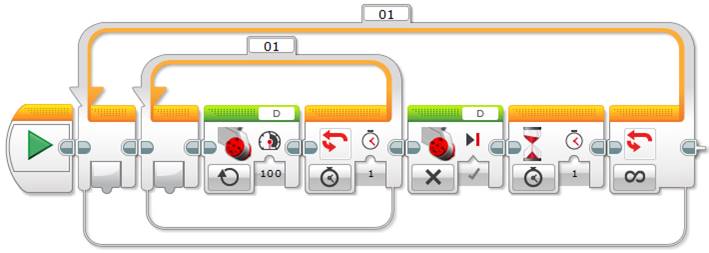
But when you test this program for long enough, you will notice a problem. The lamps will run out of phase! What shall we do to solve this annoying problem? The answer is very simple, put the two sequences inside the same loop and split the sequence beam or data cable, as shown below.
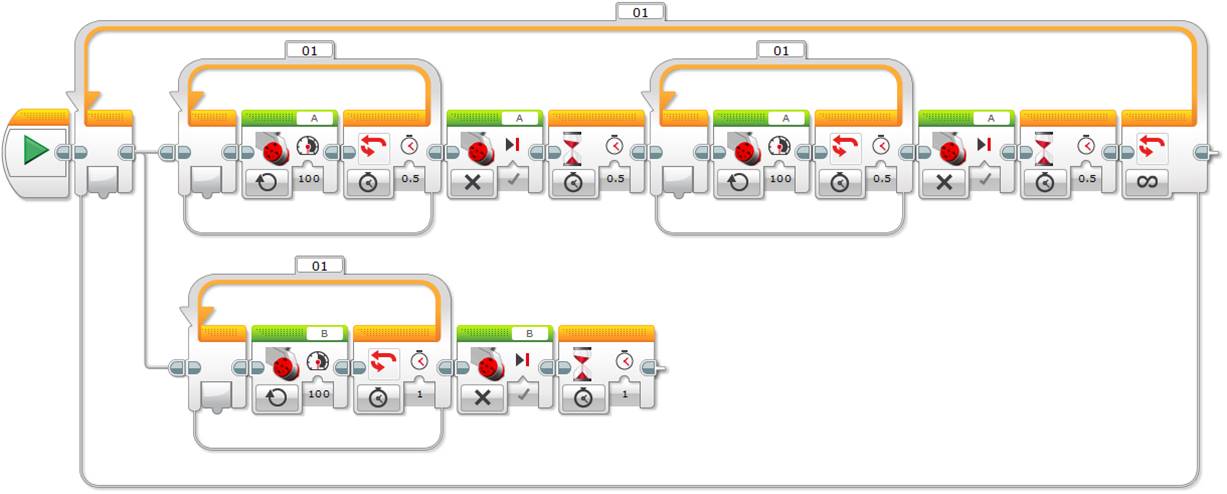
Spliting the sequence beam inside a loop to synchronize two lamps
Tip: A loop containing different sequences always waits until the longest sequence finishes before starting the next iteration.
Now we only need to optimize the program with the previous Lamp My Block as shown below.
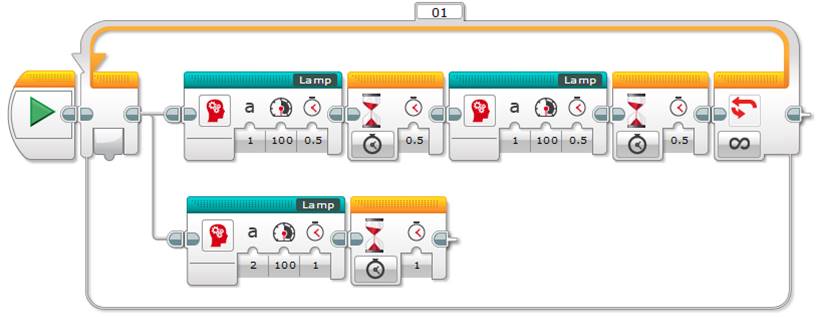
First unsuccessful attempt to synchronize two lamps using our Lamp My Block
If we run the program we will see that it does not work as expected. The program is not able to synchronize the lamps when using the previous Lamp My Block since the lamps turn on and off sequentially instead of synchronously. After running several tests you will find out that the problem lies in passing the Port as a parameter. This problem, maybe bug, occurs in all the platforms, NXT, EV3 and LabVIEW so it might be significantly difficult to fix.
The solution is quite straight forward, just create four blocks, one for each actuator port, and the program will work fine synchronizing the lamps correctly.
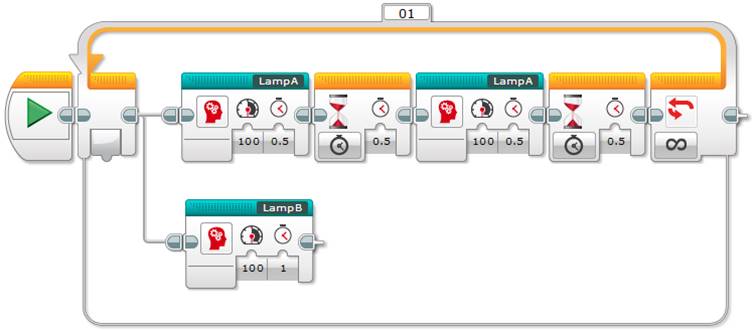
Synchronizing multiple lamps using a separate Lamp My Block for each port

LampA and LampB My Blocks with only two parameters: Power and Seconds
Tip: Because the two sequences last the same time, two seconds, we do not need to add a one second wait at the end of the second sequence because the loop will not start the next iteration until the longest sequence finishes, in this case the first one. Avoiding extra blocks makes the code more readable.
To finish the exercise, try to synchronize four different lamps, one for each EV3 actuator port, the first one every 0,5 seconds, the second one every second, the third one every 1,5 seconds and the fourth one every 2 seconds.
Now the question is can we calculate the minimum number of Lamp blocks we need to add to each sequence of an iteration of the loop? The answer is yes, we just need to find the Minimum Common Multiple (mcm) of the different timings. We can calculate this by adding the time the lamp is on to the time the lamp is off. In our example, these are the same. That is, we need to find the mcm of 1, 2, 3, and 4, which is 12. Thus the first sequence that will turn a lamp on and off every 0.5 seconds will have 12 Lamp blocks and 12 Wait blocks, the second sequence, turning a lamp on and off every second, will need 6 Lamp blocks and 6 Wait blocks, the third one, to turn a lamp on and off every 1.5 seconds, will need 4+4 blocks, and the fourth sequence, to turn a lamp on and off every 1.5 seconds, will need 3+3 blocks. The image below shows the corresponding program.

Synchronously turn four lamps on and off every 0.5, 1, 1.5 and 2 seconds respectively using four sequence beams or data cables
As before, note that we only need to add the last Wait block in the shortest time wait sequence, in our case the first one corresponding to 0.5 seconds, since the loop will start the next iteration only after finishing the longest sequence.
As you can imagine, a more complicated sequence might be quite difficult to synchronize if we use different timings to turn the lamps on and off. Can we improve the readability of such program? The answer lies in splitting the sequence beam strategically, as shown in the program below that does exactly the same as the previous one.

A more readable version of the previous program
Tip: To control how the sequence beam or data cable is split you can double click on the right connector of the block where you want to split the sequence to get some space (or to collapse the space) and next just drag this sequence connector on the right to the left connector of the new sequence’s first block.
As you can see in the above program, its readability is much better because the icons form a graphical pattern that is much easier to understand. You can use your intuition to complete the number of blocks of each sequence.
Another variation of the above program is to turn on all the lamps only for 0.5 seconds but using the same lighting sequence. The advantage of this last program pattern is that you only need to change the time each lamp block is on, you do not need to worry about the Wait blocks!

Synchronously turns on four lamps for 0.5 seconds and off every 0.5, 1, 1.5 and 2 seconds splitting the sequence beam or data cable strategically
Unit 10 exercise 4: Strategy to turn a lamp on and off given specific conditions inside a program.
Finally, since we need to use a loop to turn a lamp on and off, the question is: how can we integrate the lamp function inside a regular program? That is, how can we turn a lamp on and off given specific conditions? One approach is by using a Master/Slave design pattern architecture…
A little bit of theory
The Master/Slave design pattern is another fundamental architecture –in the previous unit we have seen the State Machine design pattern– used in LabVIEW, and thus in EV3, when you have two or more processes that need to run simultaneously and continuously but at different rates. If these processes run in a single loop, how will you control the fact that one part of the loop might take longer to execute than the other? As we have seen before, if this happens the remaining sections or split sequence beams of the loop will get delayed before executing the next iteration.
The Master/Slave design pattern consists of multiple parallel loops executing tasks at different rates where one loop acts as the master controlling the others which act as slaves and communicating with them using a messaging architecture, in EV3 we can use variables to send messages between loops.
To implement a basic Master/Slave design pattern in EV3 we need at least two loops –the master or main program loop and the slave lamp loop– and a variable controlled by the main program in the master loop that tells the slave loop when to fire an action or a condition, in our case, when the lamp loop will turn the lamp on or off.
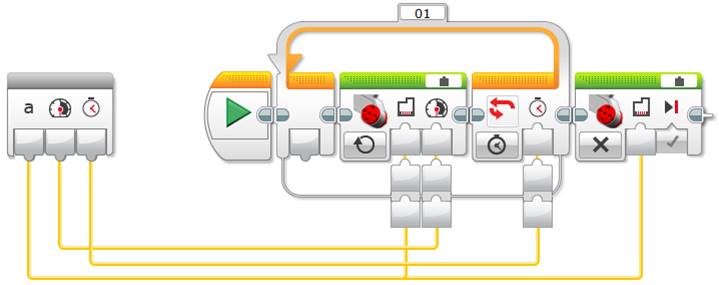
In the following example, the master loop uses a logic variable called “Lamp” to instruct the slave lamp loop to turn the lamp on or off. We use a logic variable because we only have two states, on or off, but we could use another type of variable if we had more than two cases. In addition, note that the master loop can contain several split sequences to control the lamp. In such case we should take care to avoid a race condition that could occur when different parts of the master loop program try to set the slave loop variable at the same time.
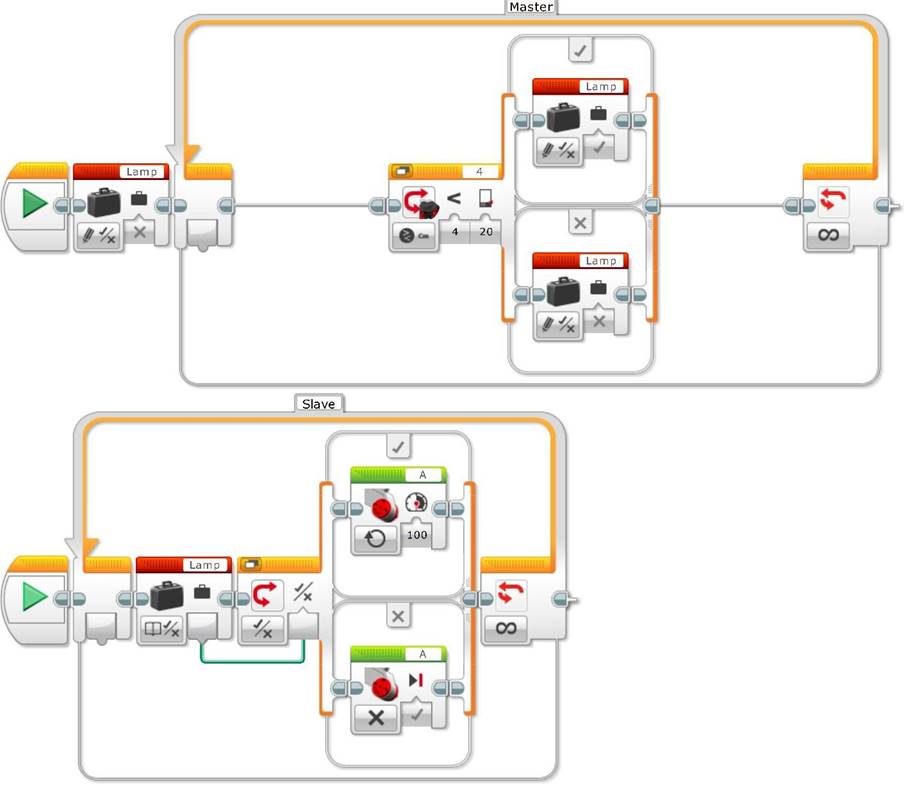
Master/Slave design pattern in EV3
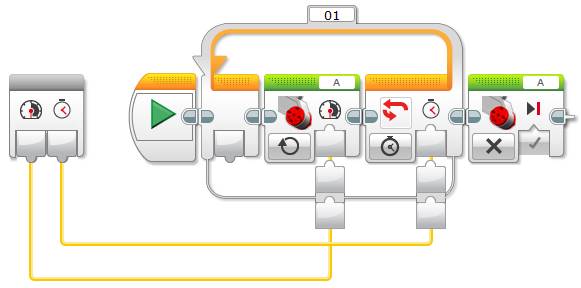
As an example, imagine the line follower robot of the previous unit to which we want to add a lamp we want to turn on every time the robot encounters an obstacle and avoids it using a subroutine. This might be quite useful for debugging purposes, that is, to know when the obstacle avoidance subroutine is called and when it is finished. What changes do we need to make to the previous program to make the lamp work?
Actually the changes are quite trivial. We simply need to set the logical variable “Lamp” to “True” in the “Obstacle” case of the main state machine master program loop just before starting the obstacle avoidance and then set it back to “False” just before setting the “State” variable to “Init” at the very end of the case. In addition, we need to run a new sequence for the slave Lamp loop as shown above. Finally, if we want to end the program nicely, for example given a specific condition, just remember to add a Loop Interrupt in the state machine master program loop with the name of the slave Lamp loop.
Acquired knowledge: With this teaching unit students will learn how to use a Motor block to control the legacy light or lamp. In addition, they will learn specific techniques to synchronize different programing flow sequences, from duplicating a program sequence, to strategically splitting a sequence beam, or to use the Master/Slave design pattern, which can be very useful to complement the State Machine architecture, studied in the previous unit. The students will also understand how to use loops that need to run at different rates and the use of variables to control these loops and, finally, they will learn how to use mathematics, in our case the Minimum Common Multiple, to calculate the number of elements we need to put in each sequence of an iteration of the loop for synchronization purposes.
UNIT 10 addendum. To unregulate or not: using the Unregulated Motor block to control the legacy lamp in EV3.
After this teaching unit was published, I came across the Unregulated Motor block which happens to be much more effective to control the legacy lamp than the Motor block. Below you will find the explanations about how to use the Unregulated Motor block to control the legacy lamp and its advantages over the normal Motor block.
A little bit of theory
According to the EV3 help, “the Unregulated Motor block does not include automatic motor control, like the normal Medium Motor block and the Large Motor block. This means that no automatic regulation on motor power will be included. The specified Power input is what is used to control the motor”. This happens to be exactly what we need because the idea is to use the power to control the light intensity of the legacy lamp.
In addition, this “raw” block provides a much better behavior when used to control the lamp because it allows the lamp to be turned on and kept on until you turn it off, just as the NXT Lamp block does!, as we will see below.
Unit 10 exercise 5: Turn the legacy lamp on and off using the Unregulated Motor block.
Let’s write a program to turn the lamp on for two seconds and then on for one second. The following program uses an Unregulated Motor block to turn the lamp on at its maximum power (100), a Wait block to keep it on for the require time, another Unregulated Motor block to turn it back off (using 0 power), and a Wait block to keep it turned off for one second. This sequence is repeated, keeping the lamp turned on first for two seconds and then on for one.

Initial non-working program to turn the lamp on and off for two seconds and one second
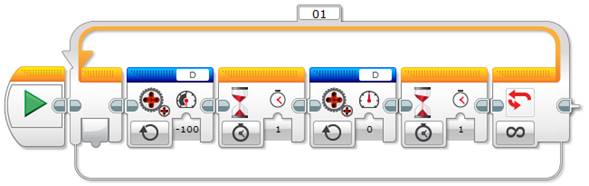
Why is the program not working? After several tests you will find that the power needs to be negative to work! So if you just change the “100” by a “-100” the previous program will perfectly work!

Program to turn the lamp on and off for two seconds and one second, using -100 power
Now you can use the Unregulated Motor block to turn the lamp on and off repeatedly, just as the NXT’s Lamp block does, as shown below.
Program to repeatedly turn the lamp on for one second, then off for one second
If we want to repeat the previous exercices of this unit, but using the Unregulated Motor block, we just need to change the My Block definition for every Action port (A, B, C and D) as shown below.

LampDu My Block for port D with only two parameters: Power and Seconds
Tip: Note that the previpous My Block multiplies the power by -1 just to avoid using a negative number as Power input and a Wait block to account for time, instead of a loop as we did previously using the Motor block.
Unit 10 exercise 6: Control the light intensity of the legacy lamp using the Unregulated Motor block.
How can we turn on the legacy lamp progressively to its maximum intensity to watch the effect of the Unregulated Motor block on the lamp? We need to use a loop to progressively increase the power, at each iteration, from 0 to 100 and then turn off the lamp to start again. What is the simplest and perhaps the most elegant way to do it? We can use the Modulo operation of the Advanced block in such a way that at every iteration of the loop it increases the intensity by 1 until it reaches 100. The Modulo operation returns the remainder of dividing the loop iteration number by 100, that is, a number between 0 and 99. The following image shows the program to accomplish this.
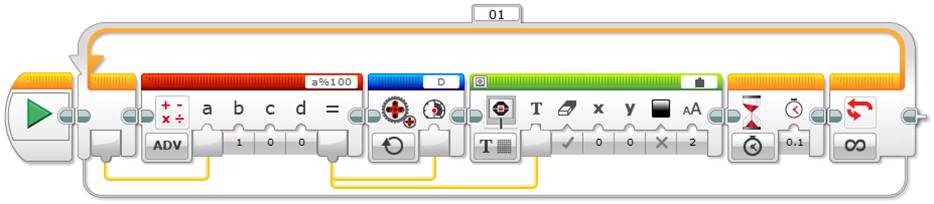
Turns on the lamp progressively at each iteration of the loop, then turns it off and starts again
Tip: Note that the above program uses a Wait block to keep the lamp on for 0.1 seconds at each iteration of the loop, and a Display block to show, on the EV3 screen, the iteration remainder used as lamp power.
Acquired knowledge: With this addendum we have learnt a way to control the legacy lamp using the Unregulated Motor block in EV3, in a very similar way as the NXT Lamp block does. We have seen that we can use the Wait block instead of the Loop block to keep the lamp on, and in a more general way, we have seen that if we turn the lamp on it remains on until we turn it off or the program ends. This allows turning on the lamp sequentially, so in many cases we will not need to split the sequence beam just to keep it on! Finally, we have learnt an elegant way to use the Advanced block Modulo operation to turn on the lamp progressively.
![]()
![]()
![]()
![]()