![]()
![]()
![]()
Teachers Introduction Course to LEGO® Mindstorms NXT & EV3
(version 4.5)
UNIT 4. Exploring thresholds: “experiment” with a wait block and a switch associated to a sensor.
This pedagogical unit four is integrally devoted to do an extremely simple exercise that allows students to think deeper about the concept of threshold and, given that it is not very complicated, it can be done before the previous pedagogical unit 3 (it has been added after it because it uses a switch).
This exercise can even be done by students without any programing experience, with the goal of only explaining and deepen into the concept of threshold between several values (explained in the previous pedagogical unit) and quickly introducing them to programing with logical structures. It is very interesting to observe that in this practical exercise the challenge is not to program the wait and switch blocks (students can get the program already written, in addition, in this example, the students understand these blocks very intuitively and with little explanations), it is to find out what are the thresholds to be used in each block to make the robot correctly detect the lines and their color.
At the end, a Mindstorms “experiment” is proposed to generate a graphic with the light (NXT) or color (EV3) sensor’s measurements that perfectly illustrate the sensor behavior, which allows verifying the studied criteria and that can be extrapolated to other sensors.
Unit 4 exercise 1: Combination of the “Wait” block with the “Switch” block: detecting different light intensities to discover different line colors using the wait and switch blocks associated to the light sensor and the “Motor” or “Move” blocks with unlimited duration.
Before starting this exercise it is advisable to remind students some theory about the threshold concept between several measurements and how to calculate it, by doing the arithmetic median between the different measurements, as we have seen in the previous pedagogical unit. In this exercise we will use several thresholds, but always between two measurements corresponding to two different colors.
To start the exercise, we need to tape on the white background of the field a green or blue color line, that is, a line with a light intensity bigger than black and lower than white. One of the black lines of the circuit’s incremental exercise can be used for this purpose.
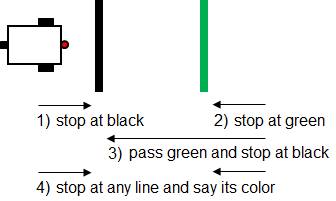
As shown in the previous image, the exercise consists on finding the right thresholds to, first, make the robot go forward and stop when it finds the black line, using only a wait block. Next, do the same exercise but stopping at the green line. Finally, the robot has to go over or “jump forward” the green line and stop at the black line. To finish the exercise, the robot has to stop at any line (green or black) and, using a switch associated to the light or color sensor, it has to say the color of the line using, in addition, a “Sound” block to find out whether it says the right color.
The first step consists in making every student or group of students to fill in a table with their robot’s light or color sensor reading values on top of the white, the green and the black colors (the readings might differ for each sensor) –by using the “View” option of the intelligent brick, selecting “Reflected light” and choosing the corresponding port of the light or color sensor– and calculating the thresholds between the different colors. At this point it is important that the students make some tests and realize that the reading of the light or color sensor’s reflected light intensity on the same color or point can vary in function of the lighting.
|
Black |
Threshold Black-Green |
Green |
Threshold Green-White |
White |
|
32% NXT 6% EV3 |
36% NXT 7% EV3 |
40% NXT 9% EV3 |
48% NXT 42% EV3 |
55% NXT 75% EV3 |
|
|
|
Threshold Black-White |
|
|
|
|
|
44% NXT 40% EV3 |
|
|
Create a new program, for example “u4ex1.rbt”, and in NXT add two Motor blocks (or a Move block) both with unlimited duration and 40% power, a Wait block associated to the light sensor (verify the sensor’s port) and two final Motor blocks to stop the robot. In EV3 you can use the “Move Tank” block instead, to start and stop the robot, and a Wait block associated to the color sensor using the “Reflected Light Intensity” in the compare option.
Suggestion: As previously said, if we want to brake the robot’s motors to accomplish a precise movement in NXT we must use Motor blocks. Remember to never use Move blocks to brake the motors, because they are not able to do it even if the attribute “Brake” is selected in the “Next Action” of the Move block. In EV3 we can use a “Move Tank” block to control both motors with only one block. In this case, make sure that the ports of the motors’ letters correspond to the ports used by the robot’s motors.
The first 3 exercises deal with varying the light intensity threshold of the wait block to stop the robot at the desired lines.
Stop the robot at the black line (NXT)


Stop the robot at the black line (EV3)
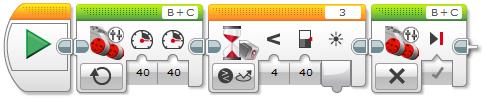
As we can observe, this first exercise will make the robot stop at the black line, and obviously we must use the threshold between black and white, in our example, 44% in NXT and 40% in EV3. Make sure that the default option “Generate light” of the light sensor attribute is selected in NXT and “Reflected Light Intensity” in the compare color sensor option is selected in EV3.
To make the second exercise, that is, to stop the robot at the green line, you need to use the threshold between green and white, 48% in NXT and 42% in EV3. But if we do not change the previous threshold, will the robot stop at the green line? The answer is yes because the value of the reflected light intensity read by the light or color sensor on the green is 40% in NXT and 9% in EV3, values which are still under the threshold between black and white, 44% in NXT and 40% in EV3.
The third exercise is more interesting because now the students need to think a little bit to put a threshold that will make the robot go over or “jump forward” the green line without stopping and stop when reaching the black line. To do this we need to put the threshold between black and green, 36% in NXT and 7% in EV3.
Finally, the fourth exercise, stopping the robot at any line and making it say its color, allow the students to finish the reflection on the threshold concept, as we will see next.
To make this fourth and last exercise, we need to add a switch also associated to the light or color sensor. This way, the first wait block will stop the robot at any colored line (in our case black or green) and the switch will find out the color of the line. Once the “Wait” and “Switch” blocks criteria and operation are explained, the students need to find out the thresholds they need to put in each case to correctly do the exercise. If the students do not have any programing knowledge, it is important to let them make tests, mistakes and think about what they do.
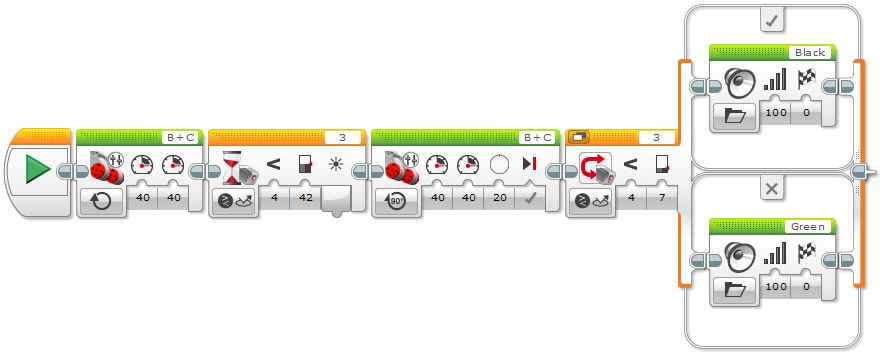
The students need to discover that to make the robot stop at any line, we need to put in the wait block the threshold between white and the lightest line, in our case the green line, 48% in NXT and 42% in EV3. In this way, if the robot stops at green, it will also stop at black. But in the switch, we need to put the threshold between the colors we want to differentiate, in our case green and black, 36% in NXT and 7% in EV3, as shown in the following images.
Stop the robot at any line and say its color (NXT)


Stop the robot at any line and say its color (EV3)
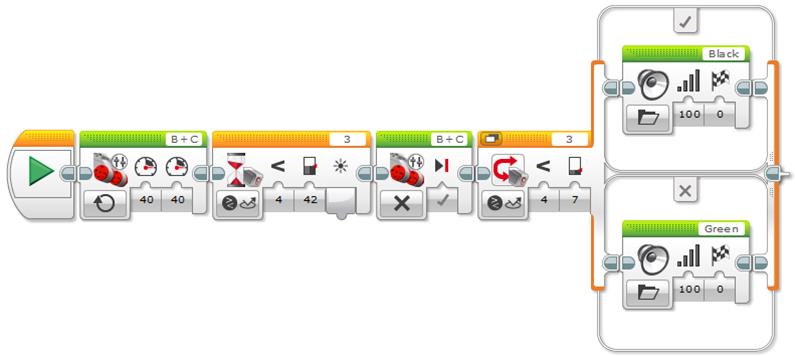
Note that inside the switch, in the darker color branch we need to add a “Sound” block and choose “Black” in the “File” attribute to make the robot say this word, and in the corresponding branch to the lightest color we need to choose “Green”.
The question is: will the robot say the right color? The answer is: not yet. Let the students make tests and discover that if they put the robot directly on top of each line, the robot does not move, given that it is already on the line, but it says the color correctly. Why? It is important to let them build up their theories and discuss them among themselves.
The answer is related to a very important fact that is to understand that the value change of a light or color sensor measurement during the color change is progressive, which means that the value do not change suddenly. This is due to the fact that the sensor progressively varies its position over the colors meanwhile the robot goes forward, what produces a progressive change of the reflected light intensity value read by the light or color sensor, as the following image shows.

The step from one color to another one is progressive,
as well as the light or color sensor readings
At the end of the exercise we will make an “experiment” in Mindstorms NXT-G and EV3 that will show graphically the values read by the light or color sensor and that will allow us to understand much better its operation.
Given that the light or color sensor reading of the reflected light intensity is progressive, when the robot stops, it does it at the threshold of the lightest line, thus, the robot will always, or almost always, say green. In other words, on top of the black line the robot will stop a little bit before than on top of the green line, when it will detect the specified threshold, what is almost unnoticeable with the naked eye.
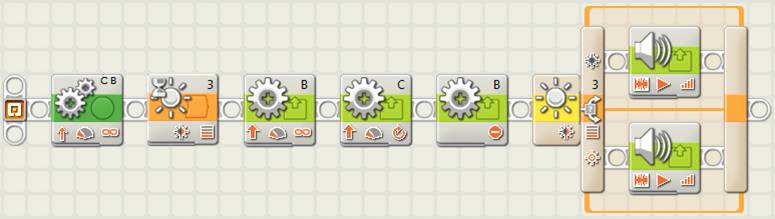
What do we need to do to make the robot say the right line color? The students very quickly understand that they need to stop the robot just on top of each line so as the light or color sensor will read the color with all its intensity and, thus, it will say its name correctly. The solution is simple, we must make the robot go a little bit forward just after the wait block, instead of immediately stopping it, as shown in the images below. We need to remember that to stop the robot accurately in NXT, we need to use Motor blocks and not a Move block, because the last one is not able to brake the motors and the robot will not stop with precision.
Stop the robot at any line and say its color, final version (NXT)
Stop the robot at any line and say its color, final version (EV3)
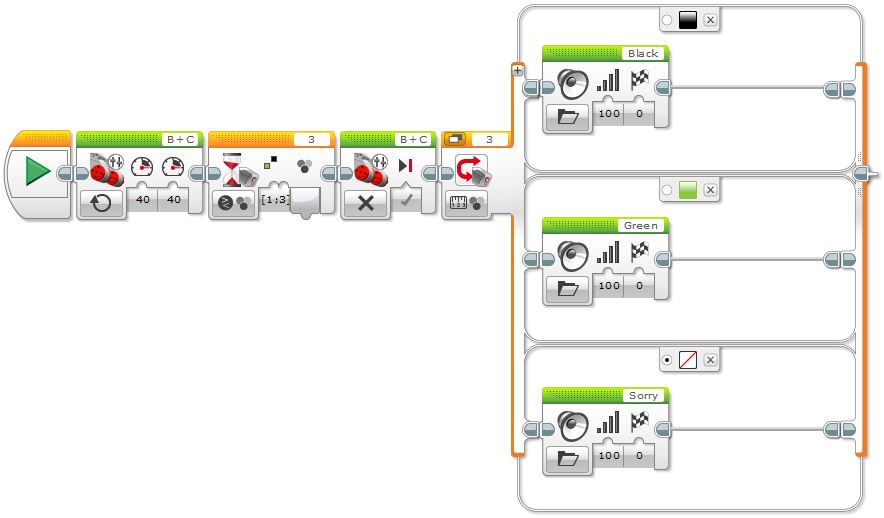
But there is another way we can differentiate colors using the color sensor in EV3, which consists in using the color sensor “Compare Color” mode in the Wait block and the “Measure Color” mode in the Switch block. The Wait block allows specifying the “Set of Colors” we want to find and the Switch block allows adding several branches, one for each color we want to differentiate. Note that we can also add a default branch with “No Color”, just in case the robot finds a different color from the ones we are interested in, and since this is the default branch, the robot will use it for those colors that do not match the other branches. But, will the program ever execute this default branch at all? The answer is no, because the Wait block will never stop at any color other than black or green! If you have some blue tape, for example, you can test this… Finally, observe that after the Wait block is executed, we do not need to move the robot a little bit forward to ensure that it stops just on top of the line, as we previously did when using the sensor in the “Reflected Light Intensity” mode, because in the “Compare Color” mode the Wait block obviously takes care of reading the color correctly.
Stop the robot at any line and say its color using the detected colors (EV3)
Finally, to better understand the light or color sensor operation, its readings and the use of thresholds, we can use a very interesting functionality of the Mindstorms NXT-G and EV3 programs named “experiment” (further on in pedagogical unit 6 we will deepen into its use, for data logging). Experiments allow recording the sensors data in function of time and generating graphics automatically to relate all the data in the same window.
In our example, we just need to put a Move block in NXT or a “Move Tank” block in EV3 with enough rotations to go over the black and the green lines, with a power of 40%. The experiment will record the light intensities read by the sensor during the robot operation. The following images show how to make the experiment putting a “Start Datalog” block to start the data logging at the beginning and a “Stop Datalog” to stop the data logging at the end in NXT, or two “Data Logging” blocks in EV3. In NXT, the attributes’ window of the initial data logging block show how to configure the experiment, and in EV3 the blocks themselves show the configuration. Basically we need to choose the number of samples per second, 15 in our case, and the light (NXT) or color (EV3) sensor with its port. Note that the duration of the data logging is unlimited because we want to do the experiment meanwhile the robot moves, and stop it just when the robot stops.
Light sensor readings’ recording experiment (NXT)
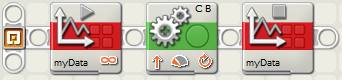

Color sensor readings’ recording experiment (EV3)

It is important to observe that if we keep the robot connected to the computer via USB or Bluetooth, in NXT we can do the experiment dynamically, that is, we can watch how the graphs are generated in real time, what allows the students to relate visually the movement of the robot with the graph being generated to understand it better.
To dynamically watch the generation of the graph in EV3 we can turn on the “Oscilloscope” mode in the “Experiment” window (this is done by default when opening a new experiment window). Let the students play within the “Experiment” window generating graphs only for the desired sensor, the color sensor, and watching the reflected light reading changes by pushing the robot by hand to go over the different colors of the field. For the purpose of this exercise in EV3 though, we will turn off the oscilloscope mode to generate the data logs programmatically.
But before running the program it is very instructive to ask the students to draw in the black board how they think the graph the robot will generate will be. We can help them by drawing a straight line at the height of the white color, at 60%, and another one at the height of the black one, at 30% (these values differ from NXT, with the light sensor, and EV3, with the color one).
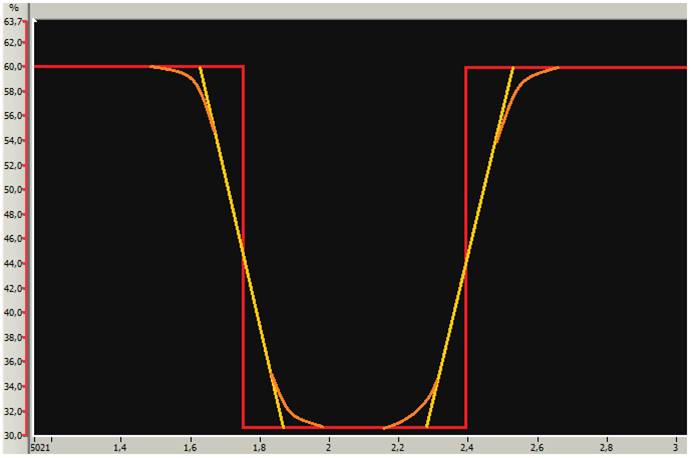
Very soon the students will realize that the color change does not happen abruptly going from white to black, as the vertical red line shows, and they propose the inclined yellow line. This is a very important step because they relate the concept with the graph. In fact, in reality, the sensor readings draw a curve like the orange curves show.
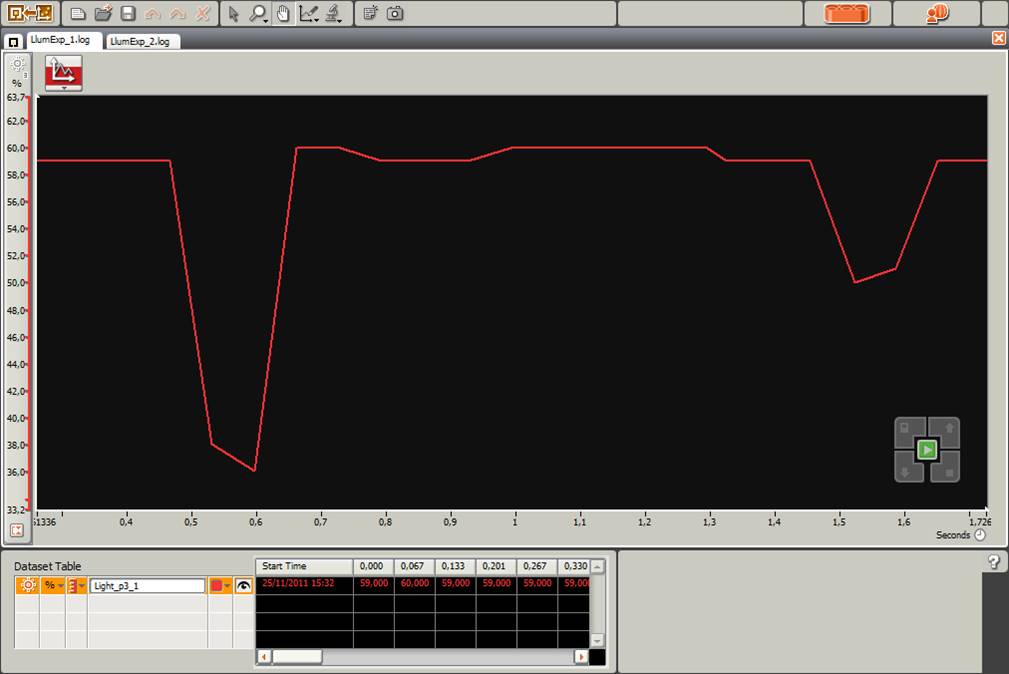
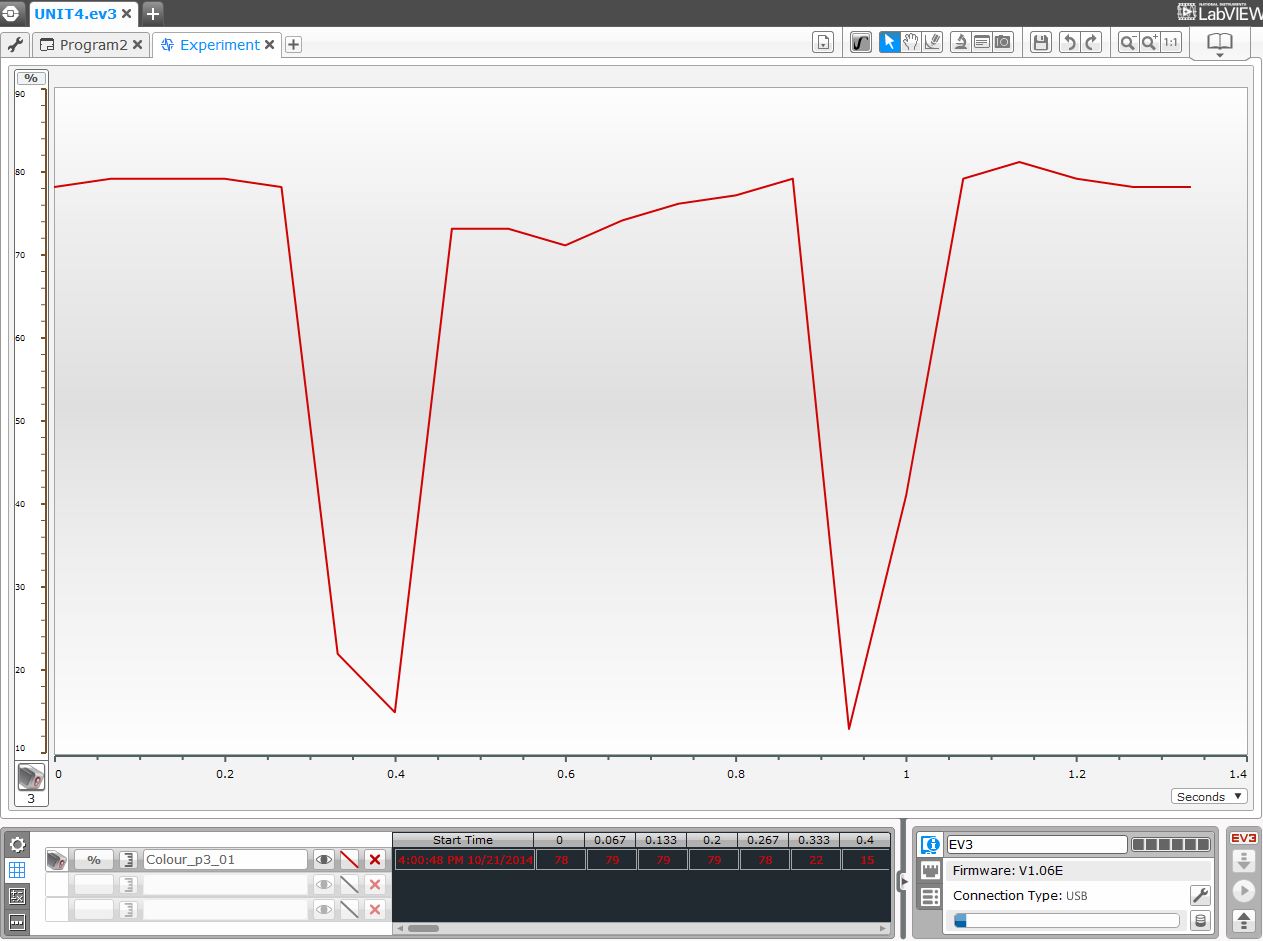
If we do the exercise, we will see that the first generated curve shows 2 steep peaks. At this point it is important that the students interpret the results. Obviously, the first and longer peak corresponds to the black color and the second to the green.
Experiment window (NXT)
Experiment window (EV3)
In addition to observe the small reading variations of the white color, the question is why the curves are so vertical? Were we wrong with the previous predictions? If we were not wrong, then how can we obtain more precise or meaningful results, where we will better see the shape of the curve? The answer is that to obtain more precision and more meaningful curves we have to increment the number of samples per second and, in addition, we can reduce the speed of the robot.
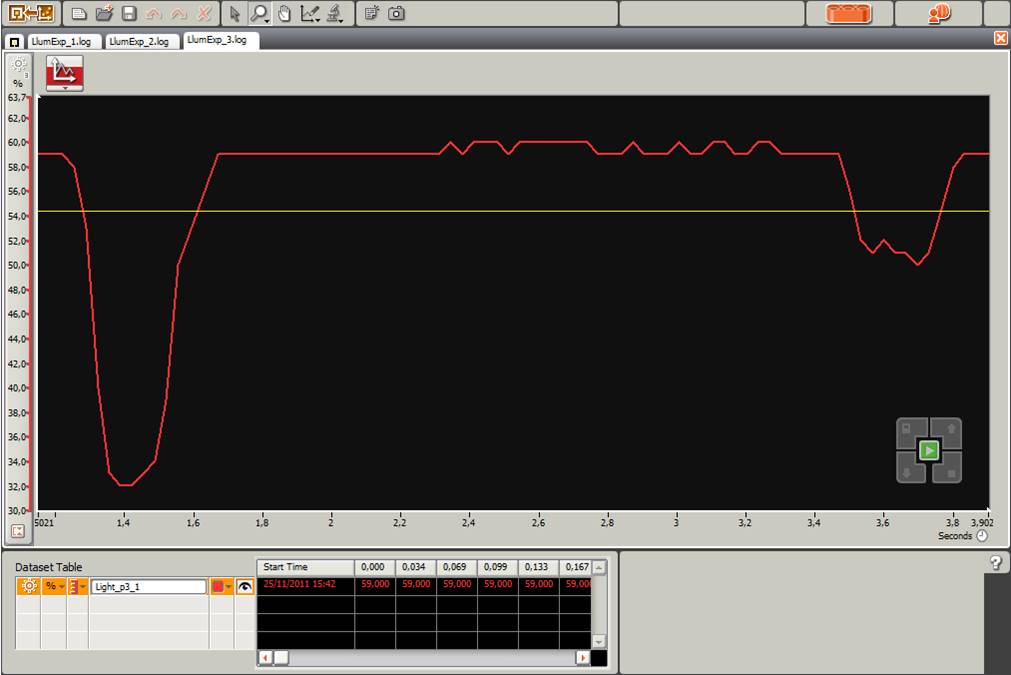
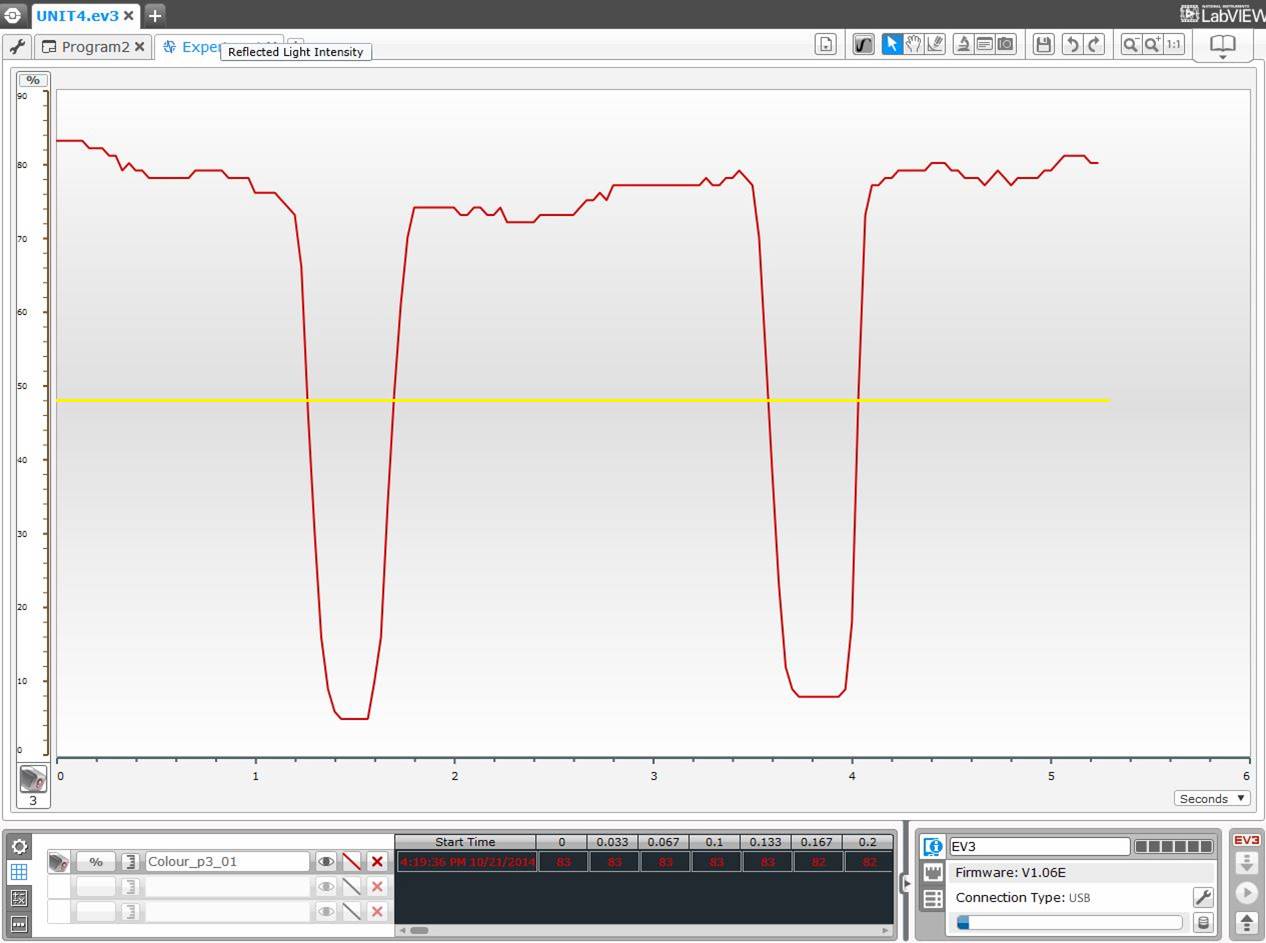
In the following images we can observe the experiment ran with 30 samples per second (double of the previous one) and a motor power of 20% (half of the previous one).
Second experiment window (NXT)
Second experiment window (EV3)
In this experiment we can see much better the light or color sensor readings through the experiment. We can also see that the readings on top of the same color are not always the same, why does this happen? It is interesting to make the students think about what are the factors they believe have an influence on these light or color sensor reading variations. Mainly the sensor readings can vary in function of the field dirt, the lighting conditions and the sensor reading own errors. Note that the reflected light readings along the darker areas are more stable than along the lighter areas…
Finally, we can see and understand visually where the robot stops at each line, that is, at the threshold between white and the lightest line, the green one, represented by the yellow line in the previous images. Thus, when reaching the black line the robot will stop a little bit before the border of the line, and when reaching the green line, it will stop right on the border of the line, since it is precisely the threshold between green and white, as we have mentioned before.
Acquired knowledge: With this pedagogical unit the student has learnt to interpret a graphic, to better understand a sensor operation and the concept of threshold, and how to use it to program a robot to make decisions in function of the environment. It is also important the required mental and intellectual effort needed when trying to deduce the results, before doing an exercise, to later prove them practically, what allows to assimilate much better the acquired knowledge and puts into practice the mental “gymnastics”.
![]()
![]()
![]()
![]()